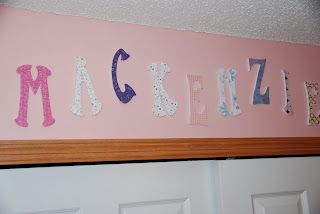
Purchase wooden letters of what you would like to spell at your local craft store (I had to go to two different stores since the first store was out of one of the letters.) While at the craft store purchase scrapbook paper for the letters, I chose a different sheet for each letter (or you could use what you have at home). I also used modge podge and white spray paint.
First I spray painted all of the letters white making sure to get the edges. Since the letters will be hanging on the wall I decided to spray paint the edges white. You could use any color to match your paper, or you could possibly skip this step also.
Once the paint is dry I cut out paper to fit around the letters. I didn't cut the letters exactly to match. I then modge podged the paper to the letters trying to get all of the air bubbles out (I didn't get all of the air bubbles out but it isn't too noticable since they are hanging up high). I also put the modge podge on a little thick on some letters which caused problems with the thinner paper.
I used a utility knife to cut around the letters as close as possible. I wanted to use a exacto knife but when I was at the hardware store I was told we had one only to find out it wasn't a exacto knife but a huge utility knife. I also didn't let the glue dry all the way which made the paper rip in some spots.
After all of the letters are cut out I used sand paper to sand around the edges to remove excess paper that I didn't cut close enough to the wood. I then put down new newspaper (so I wouldn't get shavings in the glue), and put another layer of modge podge on top to make it look less like paper glued onto wooden letters.
Lastly hang the letters on your wall (we used craft glue dots to hang them up, not sure how long they will stay up), step back and enjoy your hard work. The best reward so seeing my daughter squeel and jump and down on the bed with excitement. She gave me the cutest "thank you mama," the project was a success just because of that!
Have a good day!


1 comment:
SO cute! I love her name too! One of my favorites. Great choice of scrapbook paper too.
Post a Comment